Welcome to the JeepSpecs.com in-depth page on WJ Generation Jeep Grand Cherokee HomeLink® universal transmitter guide. We have organized as much information as we could find into a helpful article below. Is something incorrect or missing? Please get in touch with us and we’ll fix it!
HomeLink is an integrated transceiver (a transmitter and receiver) that can be programmed to activate radio frequency (RF) devices such as garage door openers, estate/community gate operators, entry door locks, home/office lighting, security systems, or other RF devices. Through a simple training process, HomeLink duplicates the codes of the original transmitter. HomeLink can be found on over 140 different vehicle models in the sun visor, overhead console, or rearview mirror (depending on vehicle make and model). HomeLink is packaged as a standard feature or integrated into optional packages.
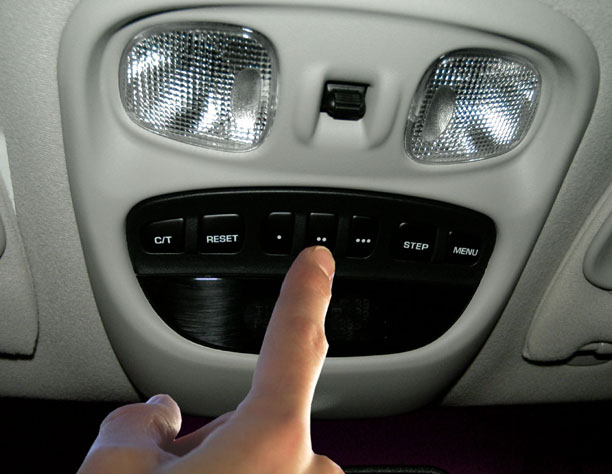
The Grand Cherokee Limited, Overland and selected special models feature HomeLink as standard factory-installed equipment. HomeLink is an optional feature on most Laredo models. The HomeLink transceiver is integral to the Electronic Vehicle Information Center (EVIC), which is located in the overhead console. The only visible component of the HomeLink system are the three transmitter push buttons centered between the four EVIC push buttons located just rearward of the EVIC display screen in the overhead console. The three HomeLink transmitter push buttons are identified with one, two or three dots so that they be easily identified by sight.
Each of the three transmitter push buttons controls an independent radio transmitter channel. Each of these three channels can be trained to transmit a different radio frequency signal for the remote operation of garage door openers, motorized gate openers, home or office lighting, security systems or just about any other device that can be equipped with a radio receiver in the 288 to 410 MegaHertz (MHz) frequency range for remote operation. The HomeLink feature is capable of operating systems using either rolling code or non-rolling code technology. The EVIC module displays messages and a small house-shaped icon with one, two or three dots corresponding to the three transmitter buttons to indicate the status of each selection.
The EVIC messages are:
- Clearing Channels – Indicates that all of the transmitter codes stored in the HomeLink system are being cleared.
- Cleared Channels – Indicates that all of the transmitter codes stored in the HomeLink system have been successfully cleared.
- Training – Indicates that the HomeLink system is in its transmitter learning mode.
- Trained – Indicates that the HomeLink system has successfully acquired a new transmitter code.
- Did Not Train – Indicates that the HomeLink system failed to acquire a new transmitter code.
- Transmit – Indicates that a trained transmitter button has been depressed and that the HomeLink system is transmitting.
The HomeLink system cannot be repaired, and is available for service only as a unit with the EVIC module. This unit includes the push button switches and the plastic module. If any of these components are faulty or damaged, the complete EVIC module must be replaced.
Setting transmitter codes
It is recommended that a new battery be placed in the hand-held transmitter of the device being programmed to Homelink for quicker training and accurate transmission of the radio frequency signal.
1. Turn off the engine
2. If the vehicle or module is brand new, the factory test codes must be erased before putting it into the training mode. This step is also taken if you want to change previously set codes, or for security reasons when selling your vehicle. To clear all settings, press the two outside HomeLink buttons (1 and 3) for twenty seconds. Individual channels cannot be erased. Erasing the transmitter codes will erase ALL programmed codes. The message “Clearing Channels” will initially appear on the display, and after 20 seconds will change to “Channels Cleared”. Do not hold the buttons for longer than 30 seconds.
3. Choose one of the three buttons to train. Place the hand-held transmitter within one to three inches away from the lower left corner of the EVIC display and push the buttons on both transmitters. The display will indicate “Training”.
4. When the universal transmitter has completed the training, the “Trained” message will be displayed and an audible beep tone will be sounded. The universal transmitter is now trained. To train the other buttons, repeat Step 3 and Step 4. If your device activates when one of the HomeLink buttons is pressed, programming is complete. Be certain to keep the hand-held transmitter in case you need to retrain the universal transmitter.
If the message “Transmit” appears on the display but your device does not activate, the device may be equipped with a “Rolling Code” system (random digital code signals from the remote transmitter).
Follow these additional steps for programming Rolling Code devices:
5. At the garage door opener receiver (motor unit) locate the “learn” or “smart” button. This can usually be found where the hanging antenna wire is attached to the motor unit. Firmly press and release the button.
6. Within 30 seconds, return to the vehicle and firmly press, hold for two seconds, and release the programmed HomeLink button. Repeat the “press, hold, release” sequence a second time, and depending on the brand of the door opener or other device, repeat the step a third time to complete the programming process.
Erasing transmitter codes
To erase the universal transmitter codes, simply hold down the two outside buttons (1 and 3) for twenty seconds. NOTE: Individual channels cannot be erased. Erasing the transmitter codes will erase ALL programmed codes.
Troubleshooting
Rolling Code Systems: If, after programming the HomeLink wireless control system, the hand-held transmitter and/or other HomeLink units in other vehicles fail to activate the rolling code equipped device, you may need to clear the device’s receiver memory. Refer to your door opener Owner’s Manual for the process. After clearing the receiver, you must reprogram the original hand-held transmitter(s) to the receiver using the procedure in the door opener’s manual. Finally, reprogram the hand-held transmitter(s) to HomeLink using the steps above.
- Check the frequency of the garage door opener’s hand-held remote(usually found on the back). HomeLink is compatible with radio-frequency devices operating between 288-399 MHz.
- Put a brand new, store bought battery in the hand held remote. During the programming process the battery’s energy tends to drain (more so with an older battery). A new battery will increase the speed and accuracy in which the hand-held remote sends its signal to HomeLink.
- Retrain HomeLink holding the hand-held remote at different lengths and angles from the HomeLink button you are trying to program. Try 4-6 inches away at a different angle.
- Cycle the hand-held remote during programming: Press and hold the HomeLink button while you press and release the hand-held remote every 2 seconds until the indicator light changes from a slow blink to a rapid flash.
- To verify HomeLink has programmed to a non-rolling code (“fixed”) garage door opener, press and hold the HomeLink button. If the indicator light remains solid, it has picked up the signal and should operate the door. If it remains a slow blink, HomeLink has not picked up the signal from the hand-held remote. Try programming the button again or chose another button to program.
- To verify HomeLink has picked up a rolling code signal: press and hold the programmed HomeLink button. If the indicator light blinks rapidly for two seconds and turns solid, HomeLink has successfully picked up the rolling code signal.
Range troubleshooting tips:
- Poor range can be caused by interference around or near the vehicle or due to the use of older batteries in the original transmitter during programming.
- Put a new battery in your hand-held remote. Training the HomeLink takes more power from the battery than when you push the button to open the door. Sometimes by putting a new battery in the hand-held remote, it does help pick up a better train and increases the range.
- Retrain the HomeLink at different lengths and angles. Start by holding the hand-held transmitter 3-4 inches away then 5-6, even 6-8 inches from the buttons. Sometimes this helps pick up a better train to HomeLink.
- Try a second remote with new batteries.
- Straighten the antenna wire that hangs down from the garage door opener motorhead.
HomeLink compatible products


There are a large number of HomeLink compatible products out on the market, including home and office lighting, electric gates, security systems, entry door locks and small appliances. Manufacturers include Radio Shack, Sears, Titan Locks, ITI Security and Chamberlain. HomeLink® is owned by Johnson Controls.