Welcome to the JeepSpecs.com in-depth page on WJ Generation Jeep Grand Cherokee headlight alignment. We have organized as much information as we could find into a helpful article below. Is something incorrect or missing? Please get in touch with us and we’ll fix it!
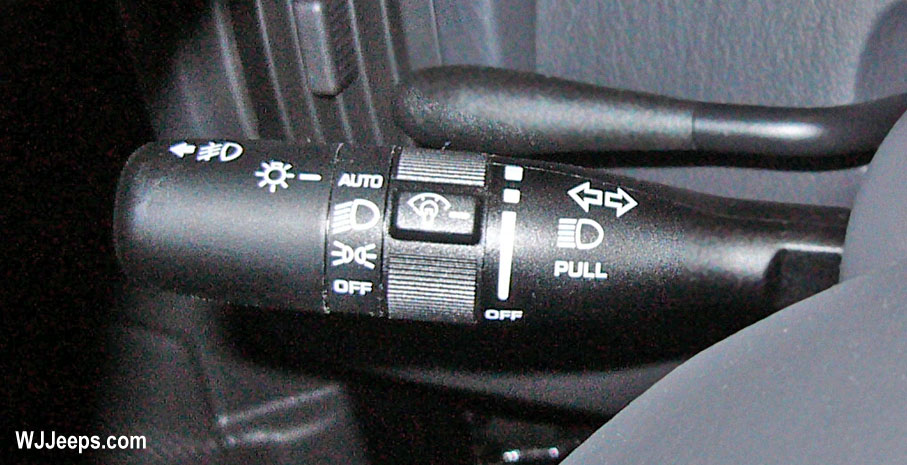
The headlamp multifunction switch on the WJ is located to the left of the steering wheel
Headlamps description
The WJ headlamps are modular in design.The headlamp module contains five bulbs; a dual filament headlamp low beam bulb, a single filament high beam bulb, two turnsignal/park bulbs, and a side marker bulb.
| CAUTION: Do not touch the glass of halogen bulbs with fingers or other possibly oily surface, reduced bulb life will result. Do not use bulbs other than those indicated in the Bulb Application table. Damage to lamp and/or Daytime Running Lamp Module can result. Do not use fuses, circuit breakers or relays having greater amperage value than indicated on the fuse panel or in the Owners Manual.Each vehicle is equipped with various lamp assemblies. A good power feed and ground are necessary for proper lighting operation. Grounding is provided by the lamp socket when it comes in contact with the metal body, or through a separate ground wire.
When changing lamp bulbs check the socket for corrosion. If corrosion is present, clean it with a wire brush and coat the inside of the socket lightly with Mopar Multi-Purpose Grease or equivalent. |
Headlamps operation
All headlamp, turn signal, park lamp, fog lamp (if equipped) and high beam operations are controlled by the left multifunction switch. Exterior lamps and bulbs are serviceable separately. See WJ bulb specifications and WJ bulb removal.
The multi-function control lever controls the operation of the headlights, position lights, turn signals, headlight beam selection, instrument panel light dimming, passing light, interior courtesy lights, front fog lights and for export models, rear fog lights.
Battery Saver Feature – If the multi-function control lever is in the headlight or rear fog light position when the ignition switch is moved to the OFF position, the exterior lights will automatically turn off after 8 minutes. If the multifunction control lever is in the front position light mode, the front position lights will remain on until the lever is moved to a different position. Normal operation will resume when the ignition is turned ON or when the headlight switch is turned to another position.
Headlights, Position Lights, and Instrument Panel Lights – Turn the end of the multi-function control lever to the first detent for front and rear position light operation. Turn to the second detent for headlight operation. Turn to the third detent for AUTO headlights operation (if equipped). To change the brightness of the instrument panel lights, turn the center portion of the multi-function control lever up or down.
Lights-On Reminder – If the headlights or position lights are on after the ignition switch is turned OFF, a chime will sound when the driver’s door is opened.
Front Fog Lights – If Equipped The front fog light switch is in the multifunction control lever. To activate the front fog lights, turn the multi-function control lever to the first detent position and pull out the end of the control lever. A light in the instrument cluster shows when the front fog lights are on.
NOTE: – The switch will turn on the front fog lights if the position lights, low beam headlights, high beam headlights or rear fog lights are on. A front fog light is a lighting device that provides illumination in front of the vehicle under conditions of fog, rain, snow, or dust. Principally, the front fog light supplements the lower beam of a standard headlight system.
NOTE: – Proper aim and adjustment of the front fog lights should be made to prevent excessive glare for other drivers.
Turn Signals – Move the multi-function control lever up or down and the arrows on each side of the instrument cluster flash to show proper operation of the front and rear turn signal lights. You can signal a lane change by moving the lever partially up or down.
Headlight Dimmer Switch – Pull the multi-function control lever towards you to switch the headlights to HIGH beam. Pull the multi-function control lever a second time to switch the headlights to LOW beam.
Passing Light – You can signal another vehicle with your headlights by lightly pulling the multi-function control lever toward the steering wheel. This will cause the headlights to turn on at high beam and remain on until the lever is released.
Headlight Time Delay – There is also a feature that delays turning off the headlights for 30, 60 or 90 seconds after the ignition switch is turned OFF. To activate the headlight delay, the multi-function control lever must be rotated to the OFF position after the ignition switch is turned OFF. Only the headlights will illuminate during this time. See the information about the overhead console to turn this feature ON/OFF or set the time interval.
The exterior lighting switch uses a hard wired five volt reference circuit from the BCM, resistor multiplexing and a hard wired switch output circuit to provide the BCM with a zero to five volt signal that indicates the status of all of the exterior lighting switch settings.
The BCM then uses control outputs to energize the headlamp and park lamp relays that activate the exterior lighting circuits. The BCM monitors the exterior lighting switch status,then sends the proper switch status messages to other modules over the Programmable Communications Interface (PCI) data bus network. The exterior lighting switch status is also used by the BCM as an input for chime warning system operation.
The exterior lighting switch cannot be adjusted or repaired and, if faulty or damaged, the entire left multi-function switch unit must be replaced.
Headlamp removal
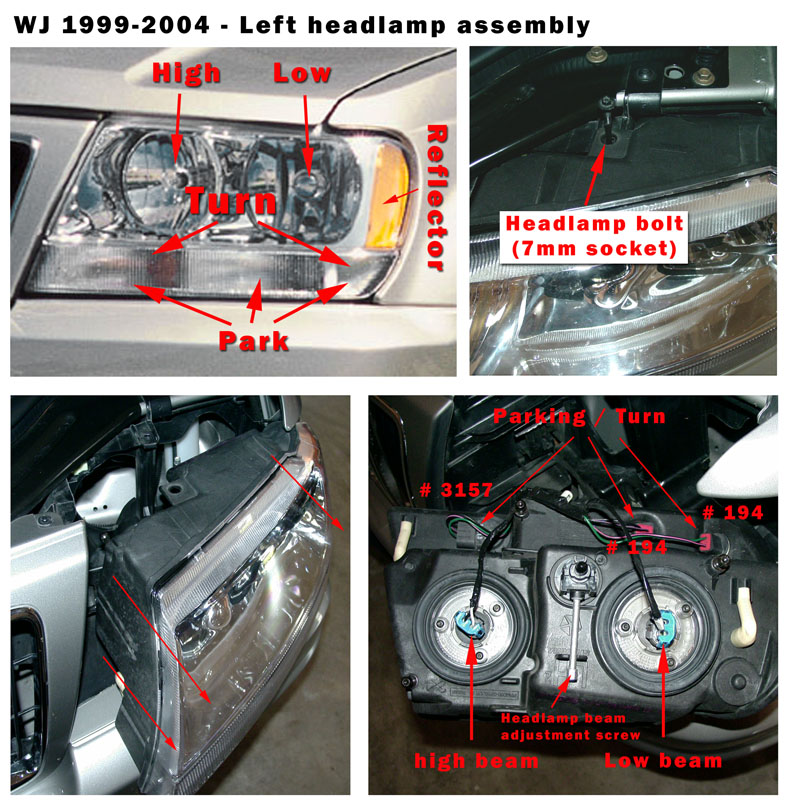
Open the hood, and using a 7mm socket remove the long headlamp jackscrew, located as shown in the photo above, 2nd from left. Grasp the headlight assembly on the upper inboard and lower outboard corners and wiggle and pull very firmly outward to disengage the 3 ball stud alignment posts from their sockets (be cautious of the sharp edges of the grille and fender areas surrounding the headlamp).
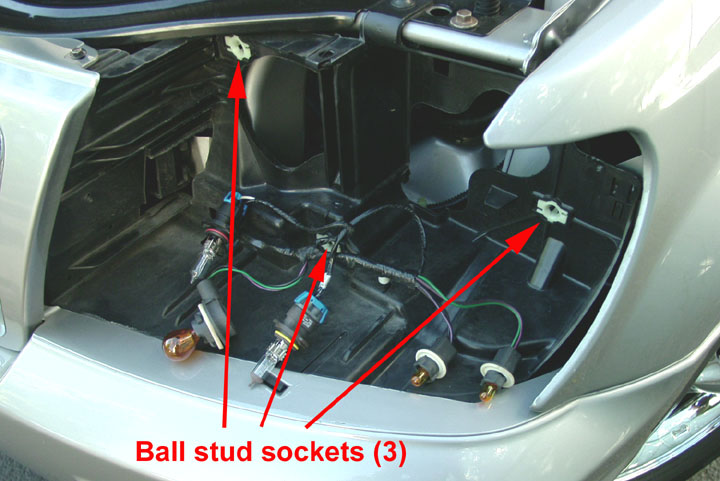
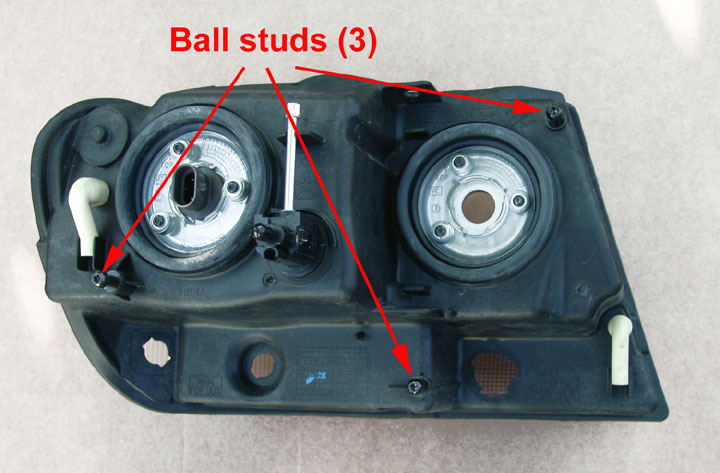
Headlamp mounting area and rear of housing, showing ball stud fasteners.
Auto headlamp sensor – diagnosis and testing
The auto headlamp sensor needs real sunlight to properly register the light level. When auto headlamps are enabled indoors, the headlamps may be turned on. The sensor is located in the center of the defroster grille at the base of the windshield. There are no faults set in the Body Control Module (BCM) for a inoperative or missing AHL Sensor. Symptom of a missing sensor or unconnected sensor would be that the Headlamps and Parklamps turn on when the vehicle is started and there is a high level of ambient light present (ie. daytime). Auto headlamps should not function in the presence of daylight.
Auto headlamp sensor – Removal
1. Remove the instrument panel top cover. Use a plastic trim stick to lift the cover up which is attached with spring clips.
2. Remove the screw attaching auto headlamp sensor to instrument panel.
3. Disengage the harness connector from auto headlamp sensor.
4. Separate the auto headlamp sensor from instrument panel..
Headlamp alignment
A. Vehicle preparation for headlamp alignment
1. Verify the headlamp switch is in the low beam setting.
2. If the vehicle is equipped with a headlamp leveling system, be certain the headlamp leveling switch is in the “0” position (export models only).
3. Correct defective components that could hinder proper headlamp alignment.
4. Verify proper tire inflation.
5. Clean headlamp lenses.
6. Verify that luggage area is loaded as the vehicle is routinely used.
7. Fuel tank should be FULL. Add 6.5 lbs. (2.94 kg) of weight over the fuel tank for each estimated gallon of missing fuel.
B. Alignment screen preparation for headlamp alignment
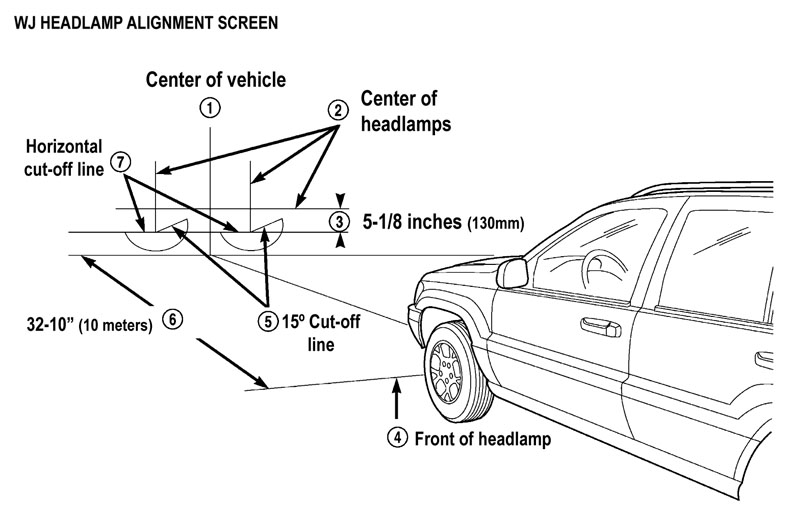
1. Position vehicle on a level surface perpendicular to a flat wall 32.8 ft (10 meters) away from front of headlamp lens (see figure above).
2. If necessary, tape a line on the floor 32.8 ft (10 meters) away from and parallel to the wall.
3. Place 75 kg in the drivers seat to simulate the ride height of the vehicle when driven.
4. Measure from the floor up 1.27 meters (4 ft) and tape a line on the wall at the centerline of the vehicle. Sight along the centerline of the vehicle (from rear of vehicle forward) to verify accuracy of the line placement.
5. Rock vehicle side-to-side three times to allow suspension to stabilize.
6. Jounce front suspension three times by pushing downward on front bumper and releasing.
7. Measure the distance from the center of headlamp lens to the floor. Transfer measurement to the alignment screen (with tape). Use this line for up/down adjustment reference.
8. Place a tape line 130 mm (5.12 in.) below and parallel to the center of headlamp line.
9. Measure distance from the centerline of the vehicle to the center of each headlamp being aligned. Transfer measurements to screen (with tape) to each side of vehicle centerline. Use these lines for left/ right adjustment reference.
C. Headlamp alignment adjustment
To adjust headlamp alignment, rotate alignment screws to achieve the specified low beam hot spot pattern.
A properly aimed low beam headlamp will project a high intensity light pattern on the screen with the horizontal cut-off line aligned with the tape line 5.12 in. (130 mm) below the headlamp centerline. The intersection of the horizontal and 15 degree cut-off lines in the projected pattern should align to the intersection of the headlamp centerline vertical tape line and the tape line 5.12 in. (130 mm) below the headlamp horizontal centerline.
NOTE: The vehicles low beam headlamps must be“ON” during the headlamp alignment procedure. The high beam pattern will be correct when the low beams are aligned properly.
Fog lamp alignment
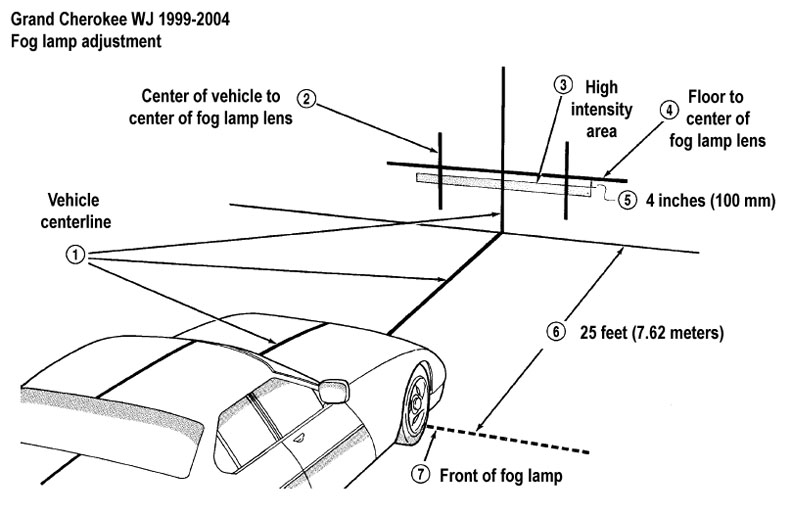
1. Prepare an alignment screen. A properly aligned fog lamp will project a pattern on the alignment 4 in. (100 mm) below the fog lamp centerline and straight ahead.
2. Rotate the adjustment screw to adjust beam height.
Fog lamp adjustment chart
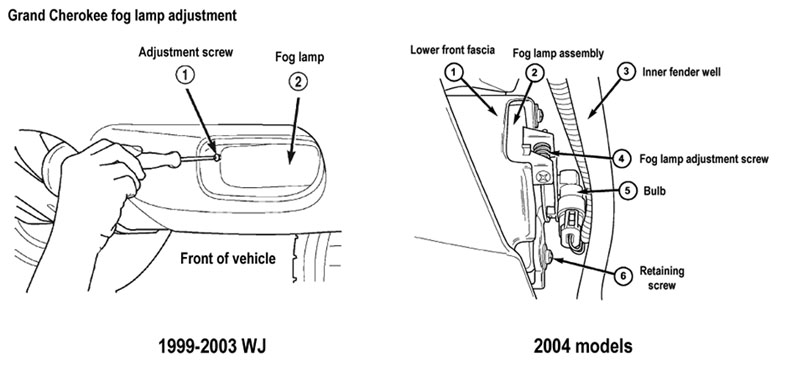
Fog lamp adjustment screw locations
Enabling the Daytime running lights feature (USA models)
The daytime running light (DRL) feature is standard on Canadian Grand Cherokee models but can also be enabled for 1999-2004 U.S. models (dealer visit required).
1. Replace the existing low beam relay with a DRL relay (P/N 56042216AB).
2. Change the vehicle country code to “Canada” with a DRBIII® tool.
3. Reset the BCM so the country code change remains in memory.
Turning OFF the Daytime running lights feature (Canadian vehicles)
For USA residents who have purchased Canadian vehicles the daytime running light (DRL) feature can be turned off. All that is required is a visit to the dealer who will reprogram the country code. The DRL relay can be left in place.
Troubleshooting – Headlamps
AUTO HEADLIGHTS CYCLE ON AND OFF WHEN THE VEHICLE IS PARKED AND TURNED OFF
(with headlamp switch in “Auto” mode)
The problem is most prominent on 1999-2001 WJ’s, but it could apply to the 2002-2004 WJ’s. The problem could be in the switch. The switch is a multiplexed circuit, the resistance of the HEADLIGHT ON position is very close to the AUTO position; the switch has been updated to correct this problem.
NO TIME DELAY WHEN THE HEADLIGHT SWITCH IS IN THE AUTO MODE, THE LIGHTS TURN OFF IMMEDIATELY
The headlights work fine, also the TIME DELAY will work fine if the headlight switch is in the ON mode and the key id turned off then the headlight switch is turned off. The only problem is that the AUTO HEADLIGHTs will not acticate the time delay when the ignition is turned off. Also the AUTO headlights work fine (turn on when dark outside). This case is not to be confused with any other headlight issue.
The most likely cause if this unique problem is usually do to erroneous voltage on one of the TWO ignition feeds going to the bcm. Please check to see if there is any aftermarket equipment (like a radio). If there is aftermarket equipment, please unplug the component then test. If not then use a dvom and apply it to the BCM ignition feeds and closely monitior the voltage when the key is turned off, the voltage on both RUN circuits should drop to ZERO volts as soon as the key is turned off. If not, then this problem with the AUTO HEADLIGHTS can be caused by aftermarket equipment.
When the ignition is turned off, the voltage on the ignition circuits does not totally go away, in turn the bcm thinks the igntion is ON. Since the bcm must see the ignition off to activate the TIME delay, it will not because of the erroneous voltage. Oddly enough the time delay works fine when the activated by turning of the ignition first before the headlight switch. In one case it was found that an aftermarket radio was bleeding voltage onto the ignition circuit. This is very unique because the time delay should react the same in both modes (auto and manual) but it does not! The BCM tolerances on these circuits are very finite, its possible that the energy is disappating more so when the MANUAL time delay is activated.
HEADLAMPS ARE DIM WITH ENGINE IDLING OR IGNITION TURNED OFF
1. Loose or corroded battery cables – Clean and secure battery cable clamps and posts.
2. Loose or worn generator drive belt – Adjust or replace generator drive belt.
3. Charging system output too low – Test and repair charging system.
4. Battery has insufficient charge – Test battery state-of -charge.
5. Battery is sulfated or shorted – Load test battery.
6. Poor lighting circuit Z1-ground – Test for voltage drop across Z1-ground locations.
7. Both headlamp bulbs defective – Replace both headlamp bulbs.
HEADLAMP BULBS BURN OUT FREQUENTLY
1. Charging system output too high – Test and repair charging system.
2. Loose or corroded terminals or splices in circuit – Inspect and repair all connectors and splices.
HEADLAMPS ARE DIM WITH ENGINE RUNNING ABOVE IDLE*
1. Charging system output too low – Test and repair charging system.
2. Poor lighting circuit Z1-ground – Test for voltage drop across Z1-ground locations.
3. High resistance in headlamp circuit – Test amperage draw of headlamp circuit.
4. Both headlamp bulbs defective – Replace both headlamp bulbs.
HEADLAMPS FLASH RANDOMLY
1. Poor lighting circuit Z1-ground – Test for voltage drop across Z1-ground locations.
2. High resistance in headlamp circuit – Test amperage draw of headlamp circuit. Should not exceed 30 amps.
3. Loose or corroded terminals or splices in circuit – Inspect and repair all connectors and splices.
HEADLAMPS DO NOT ILLUMINATE
1. No voltage to headlamps – Repair open headlamp circuit.
2. No Z1-ground at headlamps – Repair circuit ground
3. Faulty headlamp switch – Refer to BCM diagnostics.
4. Blown fuse for headlamps – Replace fuse.
5. Broken connector terminal or wire splice in headlamp circuit – Repair connector terminal or wire splice.
6. Both headlamp bulbs defective – Replace both headlamp bulbs.
Troubleshooting – Fog lamps
FOG LAMPS ARE DIM WITH ENGINE IDLING OR IGNITION TURNED OFF
1. Loose or corroded battery cables – Clean and secure battery cable clamps and posts.
2. Loose or worn generator drive belt – Adjust or replace generator drive belt.
3. Charging system output too low – Test and repair charging system.
4. Battery has insufficient charge – Test battery state-of-charge.
5. Battery is sulfated or shorted – Load test battery.
6. Poor lighting circuit Z1-ground – Test for voltage drop across Z1-ground locations.
FOG LAMP BULBS BURN OUT FREQUENTLY
1. Charging system output too high – Test and repair charging system.
2. Loose or corroded terminals or splices in circuit – 2. Inspect and repair all connectors and splices.
FOG LAMPS ARE DIM WITH ENGINE RUNNING ABOVE IDLE
1. Charging system output too low – Test and repair charging system.
2. Poor lighting circuit Z1-ground – Test for voltage drop across Z1-ground locations.
3. High resistance in fog lamp circuit – Test amperage draw of fog lamp circuit.
FOG LAMPS FLASH RANDOMLY
1. Poor lighting circuit Z1-ground – Test for voltage drop across Z1-ground locations.
2. High resistance in fog lamp circuit – Test amperage draw of fog lamp circuit.
3. Faulty multifunction switch.
4. Loose or corroded terminals or splices in circuit – Inspect and repair all connectors and splices.
FOG LAMPS DO NOT ILLUMINATE
1. Blown fuse for fog lamp – Replace fuse.
2. No Z1-ground at fog lamps – Repair circuit ground.
3. Faulty multifunction switch.
4. Broken connector terminal or wire splice in fog lamp circuit – Repair connector terminal or wire splice.
5. Defective or burned out bulb – Replace bulb.