Welcome to the JeepSpecs.com in-depth page on WJ Generation Jeep Grand Cherokee steering wheels and buttons Guide. We have organized as much information as we could find into a helpful article below. Is something incorrect or missing? Please get in touch with us and we’ll fix it!
Cruise control switches
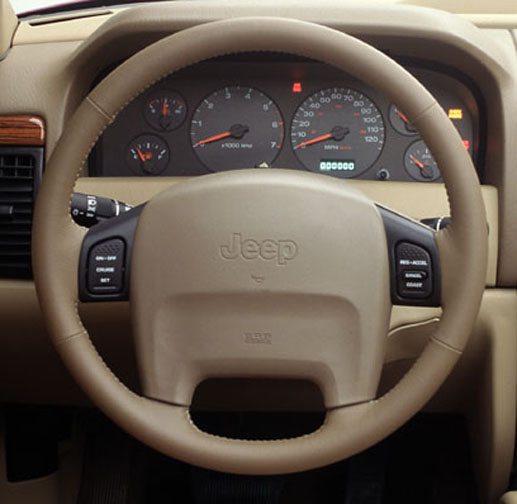
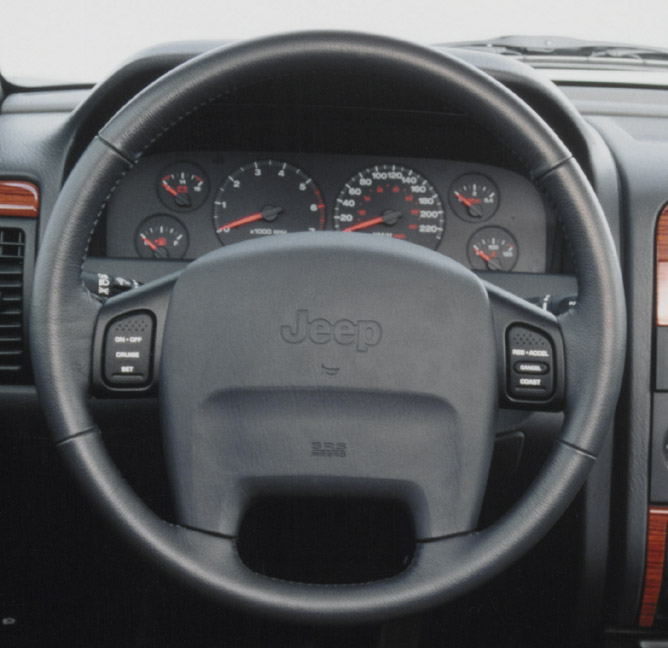
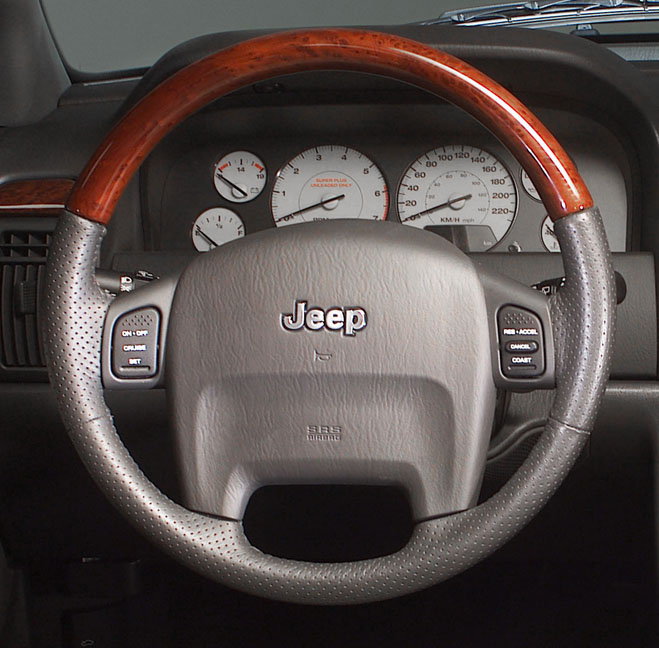
The cruise control system is operated by two steering wheel mounted switches. The switches are labeled: ON/OFF, RES/ACCEL, SET, COAST, and CANCEL. The system is designed to operate at speeds above 30 mph (50 km/h). The speed control system is electronically controlled and vacuum operated. Electronic control of the speed control system is integrated into the Powertrain Control Module (PCM).
Remote radio switches (back of steering wheel)
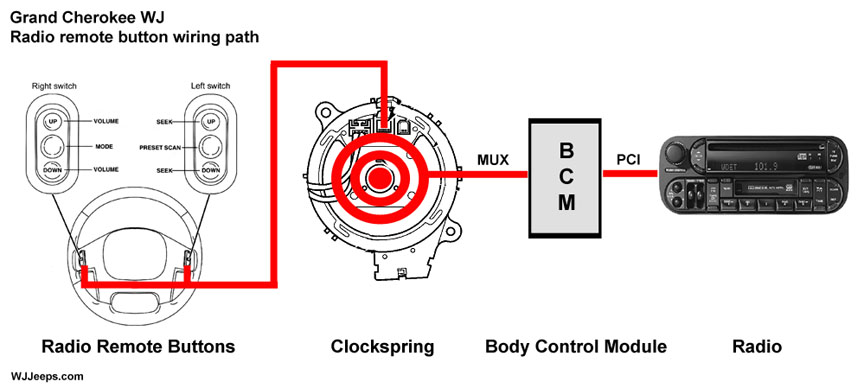
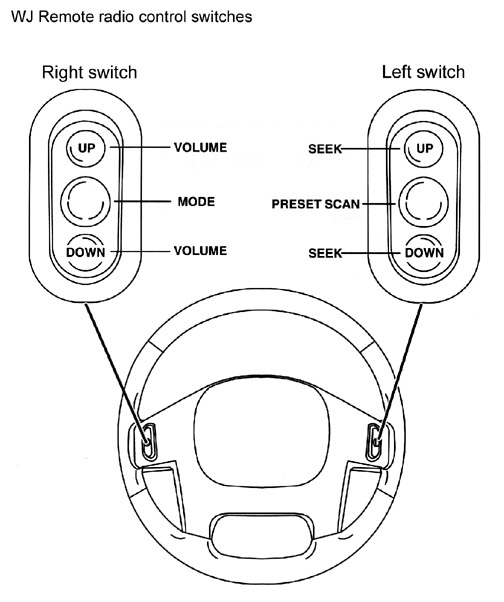
Remote radio switches are included on models equipped with the optional leather-wrapped steering wheel. The two rocker-type switch units are mounted in the upper spoke covers of the rear (instrument panel side) steering wheel trim cover. The switch unit on the left side is the seek switch and has seek up, seek down, and preset station advance switch functions. The switch unit on the right side is the volume control switch and has volume up, volume down, and mode advance switch functions. If equipped with the optional RB1 Navigation Radio, the switches will also operate selected Navigation features.
Cruise or radio switch removal and replacement
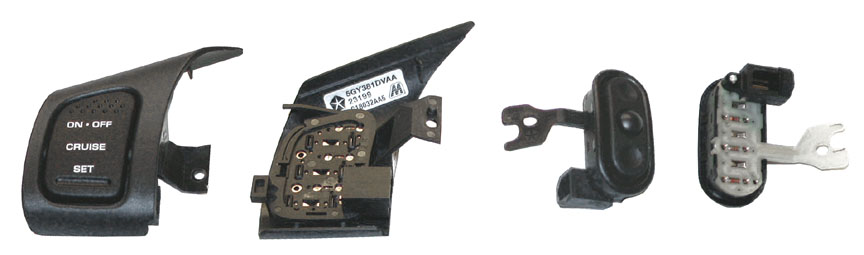
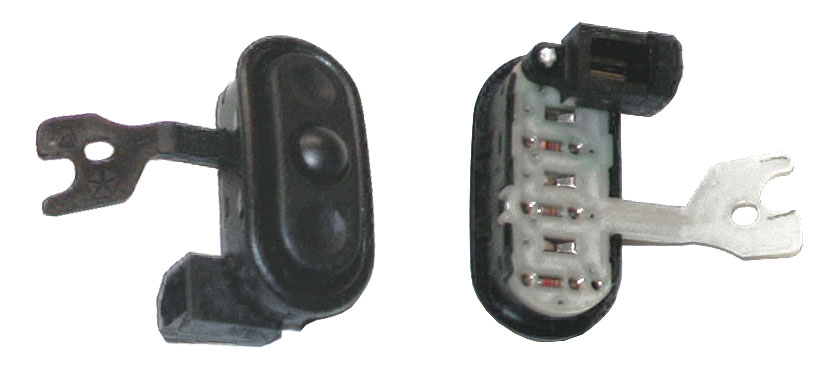
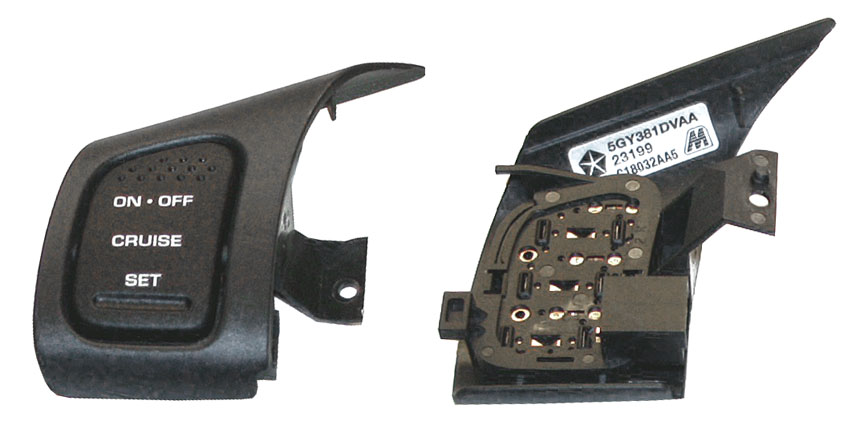
Front and back view of the left cruise and left radio remote switches
The Cruise control and remote radio switches can easily be replaced. The airbag module must be unbolted to gain access to the switches. The airbag module can be moved aside without having to unhook any of its wires.
1. IMPORTANT: Disable the supplemental restraint system before attempting any steering wheel, steering column or instrument panel component diagnosis or service. To do so, disconnect and isolate the battery negative (ground) cable, then wait two minutes for the system capacitor to discharge before performing further diagnosis or service. This is the only sure way to disable the supplemental restraint system. Failure to take the proper precautions could result in accidental airbag deployment and possible personal injury.
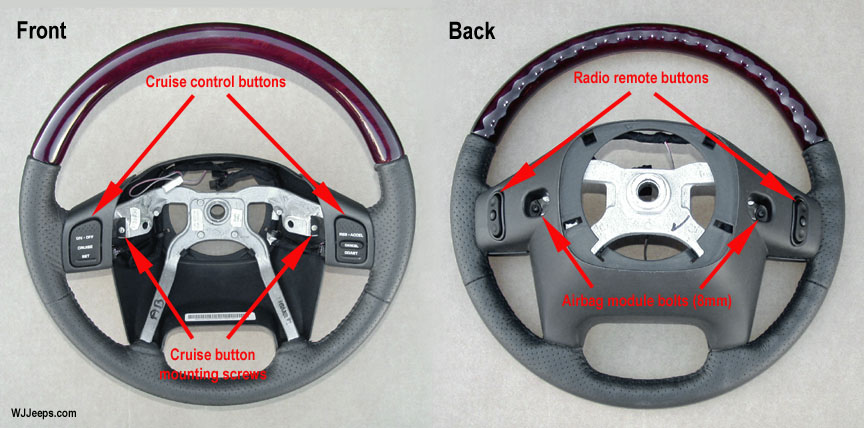
Front and back views showing button locations & mounting detail for radio switch
2. Once the battery has been disconnected for a minimum of two minutes, remove the two 8mm bolts from the rear that secure the driver airbag to the steering wheel armature. The bolt location can be seen in the above left photo.
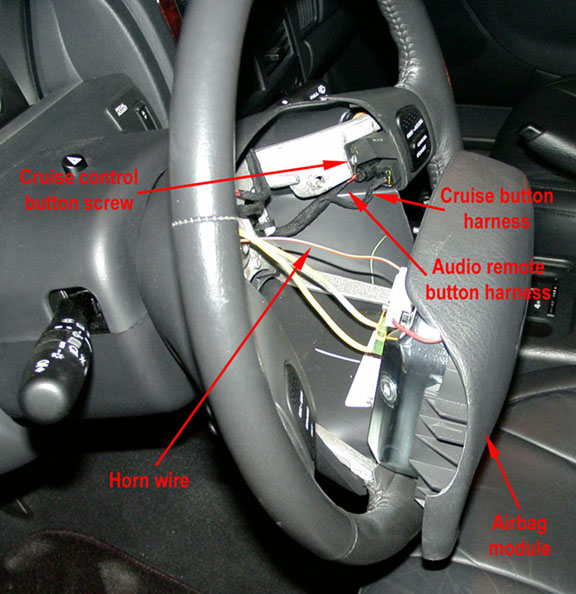
Airbag module shown resting on steering wheel, wiring does not need to be unhooked
3. Pull the driver airbag away from the steering wheel far enough to carefully rest it on the bottom of the steering wheel, as shown in the photo above. You can access the cruise and radio switches for removal without unhooking the airbag, but be very careful that the airbag module is secure and no stress is put on the wiring. A short piece of duct tape can be used to make sure the module does not fall.
4. Remove the electrical connector from the Cruise button by pushing on the locking tab located underneath it. Remove the phillips head screw securing the Cruise button. Lift up on the button to unsnap it from its mounting and pull it toward the center of the steering wheel to slide it out. A new button can now be installed. If you are replacing the radio remote button proceed to step 5.
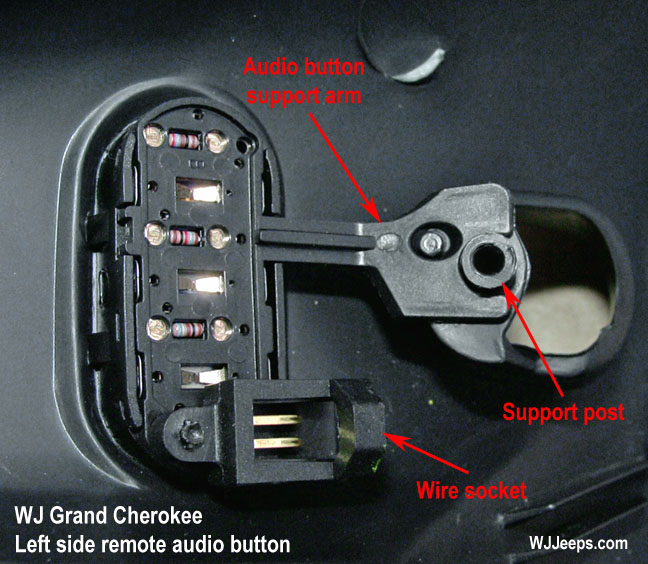
5. If you are replacing the radio button, it is removed by pressing it out through the back. Press firmly and evenly outward on the back of the switch to unsnap its side tabs from the mounting hole. Note that the radio switches have a plastic arm that is aligned onto an anchor post. When removing and reinstalling these switches be careful not to break the arm, although it is somewhat strong. When installing the radio remote switches make sure that they are seated firmly in the mounting hole. They need to be pressed hard to “snap” them in place.
6. Carefully position the driver airbag module in the steering wheel. Be certain that the clockspring pigtail wires and steering wheel wire harness in the steering wheel hub area are not pinched between the driver airbag and the steering wheel armature. From the underside of the steering wheel, install and tighten the two screws that secure the driver airbag to the steering wheel armature. Tighten the screws to 10 Nm (90 in. lbs.).
Adding factory radio remote control switches to base models
Some base Laredo models (and the 2004 Columbia Editions) came equipped without the factory radio remote control switches. Adding these buttons can be accomplished in two different ways, by using the existing bezel and cutting out the switch mounting holes, or replacing the existing bezel with the premium version that has the holes cut out from the factory. The latter method requires removal of the steering wheel.
IMPORTANT: Owners of 1999-2001 models should verify that their radio has the single-wire 2-pin PCI jack. All radios that have a CD changer jack will have the PCI jack. If the radio does not have the jack, it would have to be upgraded to a model with the jack in order to utilize the remote radio switches. On vehicles that came with non-PCI radios, the PCI harness is usually present in the dash area attached to the radio wire harness.
On 2002-up models, the PCI wire is incorporated into the main radio harness and is present on all models.
Option 1: Installation using the base bezel (radio switch holes not cut out)
This method does not require removal of the steering wheel and uses the existing factory steering wheel bezel. The bezels for most (if not all) WJ’s that come without the remote radio switch option have an indentation area marked where the switches mount. This area will need to be drilled out with a dremel or other cutting tool.
Parts required:
| A. Base steering wheel bezel | C. Wiring harness | B. Remote radio switches |
|---|
A. Existing bezel (the holes for the radio switches must be cut out)
B. Left and Right radio remote switches – One of each.
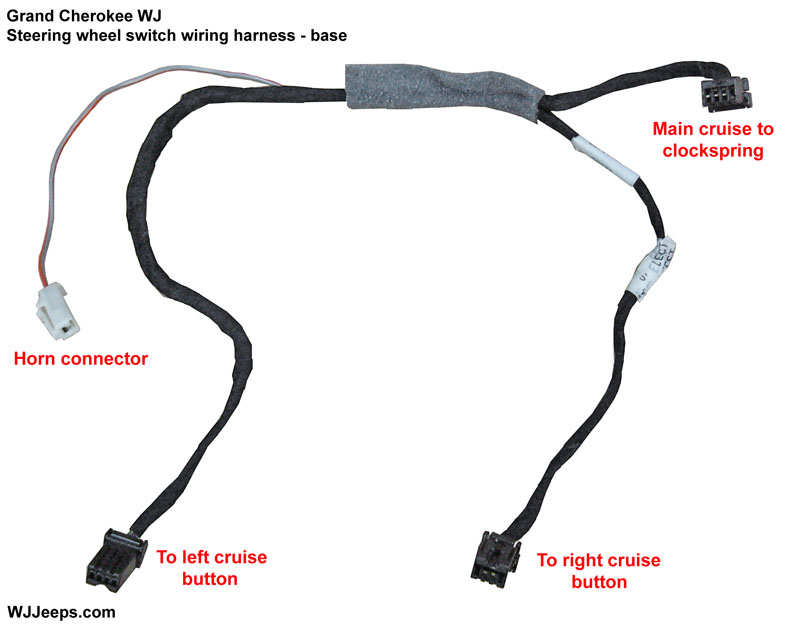
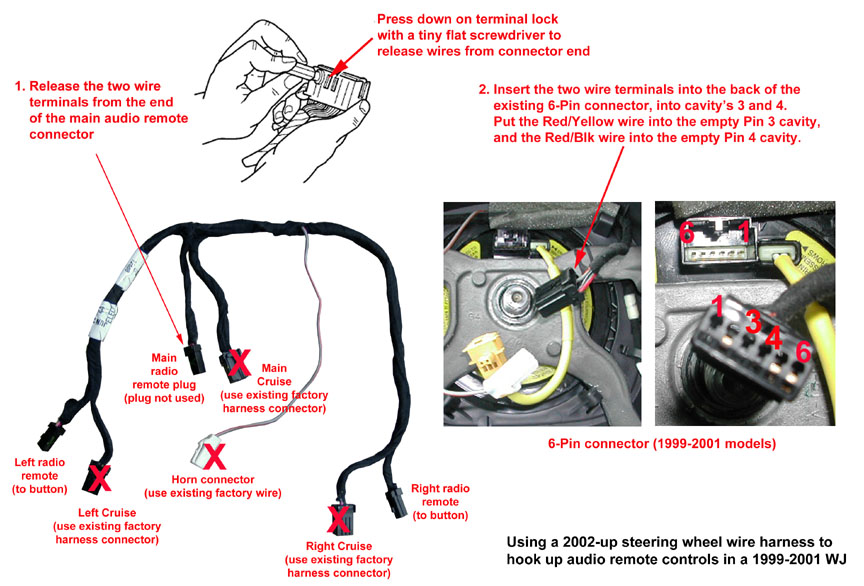
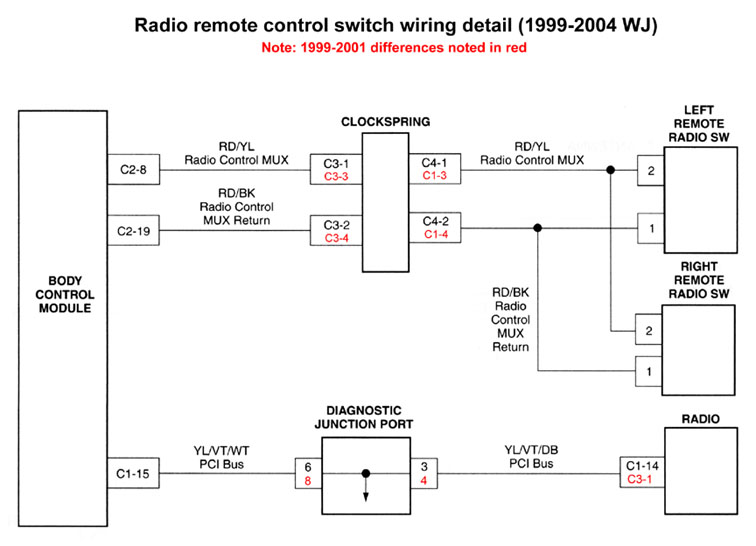
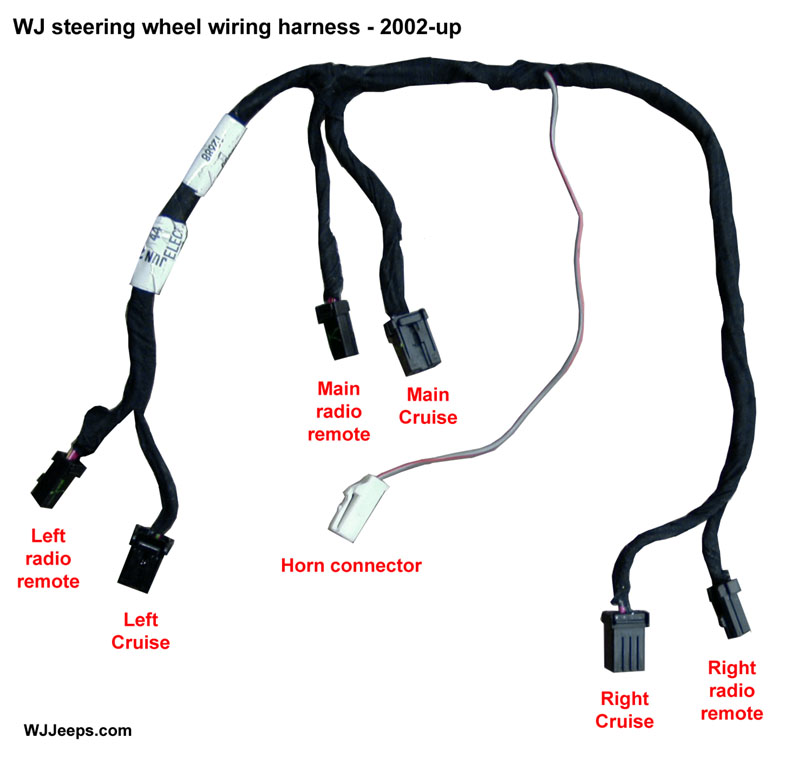
C. Steering wheel wiring harness(es) – 1999-2001 model Grand Cherokees use one type of harness while 2002-2004 models use a second type. The 1999-2001 steering wheel harness is very expensive. However, it’s possible to use the much cheaper 2002-up harness on 1999-2001 WJ’s. The existing factory harness that is used for the cruise control switches and horn is left in place, while the new harness is added for the remote radio switch connections. The new harness will plug in to both radio switches, and on the other end of the harness the two wire spades are removed from the connector end. These two wires are then installed into the end of the 6-way factory connector that goes to the clockspring, as shown in the diagram below.
Installation steps:
CAUTION: Disable the supplemental restraint system before attempting any steering wheel, steering column or instrument panel component diagnosis or service. To do so, disconnect and isolate the battery negative (ground) cable, then wait two minutes for the system capacitor to discharge before performing further diagnosis or service. This is the only sure way to disable the supplemental restraint system. Failure to take the proper precautions could result in accidental airbag deployment and possible personal injury.
1. Owners of 1999-2001 models should verify that their radio has the single-wire 2-pin PCI jack and that it is plugged in to the radio. All radios that have a CD changer jack will have the PCI jack. If the radio does not have the jack, it would have to be upgraded to a model with the jack in order to utilize the remote radio switches. On vehicles that came with non-PCI radios, the PCI harness is usually present in the dash area, tapes to the radio wire harness.
For 2002-2004 models, the PCI wiring is already in place, wired into the main radio connector.
2. Unbolt the airbag per the airbag and switch removal directions above. For this switch upgrade method, the airbag will have to be unbolted and moved aside. None of the wiring needs to be unhooked from the airbag module.
3. Remove the phillips screw attaching each cruise control switch and set the switches aside.

4. Cut the holes in the back of the bezel for the radio switches. A dremel, drill or similar tool can be used. Start by making the hole smaller than it should be and carefully shaving off a little more until the switch fits snug. The left and right switches are different and can only fit on their respective sides.
5. Once the holes have been cut, install the radio switches so they are firmly seated in the mounting hole and that the plastic “arms” are lined up into their guideposts. If the switches mount loosely you can secure them from the inside with some hot glue, or add some electrical tape to the perimeter of the switch to make it fit the hole tighter.
6. Reinstall both cruise control buttons.
7. Wiring connections:
| 1999-2001 models:A. Replace the existing base harness with the 2001 premium harness (P/N 56042592AB). This harness, for reasons unknown, is expensive but can sometimes be found for a reasonable price at a salvage yard.
OR B. Leave the existing harness attached as it is (to the cruise buttons and clockspring). Obtain a 2002-2004 premium harness (P/N 56042934AA, MSRP $149.99) and adapt it to plug into the 6-pin clockspring connector per this diagram. 2002-2004 models: Replace the existing base harness with the 2002-2004 premium harness (P/N 56042934AA, MSRP $149.99). This harness will plug directly into the clockspring and into the cruise and radio switches without any modifications.
|
8. Reinstall the airbag. Carefully position the driver airbag module in the steering wheel. Be certain that the clockspring pigtail wires and steering wheel wire harness in the steering wheel hub area are not pinched between the driver airbag and the steering wheel armature. From the underside of the steering wheel, install and tighten the two 8mm bolts that secure the driver airbag to the steering wheel armature. Tighten the bolts to 10 Nm (90 in. lbs.).
9. Reconnect the negative battery terminal, turn on the radio and test the switches.
Option 2: Installation using premium factory bezel:
This method requires removal of the steering wheel in order to replace the base bezel with the upgraded bezel that has the switch holes cut out from the factory. The hardest part is finding the upgraded bezel as it is not sold separately by Jeep, it only comes with new steering wheels. You may have some luck finding one at a salvage yard. Find a vehicle with a damaged steering wheel and you could probably get the bezel, switches and switch wiring harness at a very reasonable price. The remote switches themselves are available separately as are the wiring harnesses. For some reason, the harness for 1999-2001 is exceptionally expensive, not sure why but it has a MSRP of around $100.00. The 2002-2004 harness is only around $20 and can be used for all model years.
Parts required:
| A. Base steering wheel bezel | C. Wiring harness | B. Remote radio switches |
|---|
A. Steering wheel rear bezel housing – Not available separately from Jeep, it is sold only with new leather covered steering wheels). It is best to try and find the bezel at a junkyard, preferably with the radio remote switches included.
B. Left and Right radio remote switches – One of each.
C. Steering wheel switch wiring harness – 1999-2001 model Grand Cherokees use one type of harness while 2002-2004 models use a second type. For some reason the 1999-2001 steering wheel harness is very expensive. However, it’s possible to use the much cheaper 2002-up harness on 1999-2001 WJ’s. The existing factory harness that is used for the cruise control switches is left in place, while the new harness is used for the remote radio switch connections. The new harness will plug in to both radio switches, and on the other end of the harness the two wire spades are removed from their connectors. These two wires can then be inserted and locked into the end of the 6-way factory connector that goes to the clockspring, as shown in this diagram.
D. Steering wheel bolt – A new bolt must be used when the steering wheel is reinstalled.
Installation steps:
CAUTION: Disable the supplemental restraint system before attempting any steering wheel, steering column or instrument panel component diagnosis or service. To do so, disconnect and isolate the battery negative (ground) cable, then wait two minutes for the system capacitor to discharge before performing further diagnosis or service. This is the only sure way to disable the supplemental restraint system. Failure to take the proper precautions could result in accidental airbag deployment and possible personal injury.
1. Owners of 1999-2001 models should verify that their radio has the single-wire 2-pin PCI jack and that it is plugged in to the radio. All radios that have a CD changer jack will have the PCI jack. If the radio does not have the jack, it would have to be upgraded to a model with the jack in order to utilize the remote radio switches. On vehicles that came with non-PCI radios, the PCI harness is usually present in the dash area, tapes to the radio wire harness.
For 2002-2004 models, the PCI wiring is already in place, wired into the main radio connector.
2. Remove and unhook the airbag per the airbag and switch removal directions above. For this switch upgrade method, the airbag will have to be totally unhooked and set aside.
3. Remove both cruise control switches, these are each attached with one Phillips screw.
4. Unhook the cruise/radio connector(s) from the clockspring
5. With a steering wheel puller tool, remove the steering wheel:
A. Mark the location of the steering wheel where it attaches to the spline.
B. Partially remove the steering wheel bolt and leave the bolt in the column.
C. Install steering wheel puller using special tool C-3894–A or equivalent, using the top of the bolt to push on.
Ensure the puller jaws are seated in the pockets of the back of the steering wheel armature.
D. Remove steering wheel.
NOTE: Do not reuse the old steering wheel bolt (a new bolt must be used).
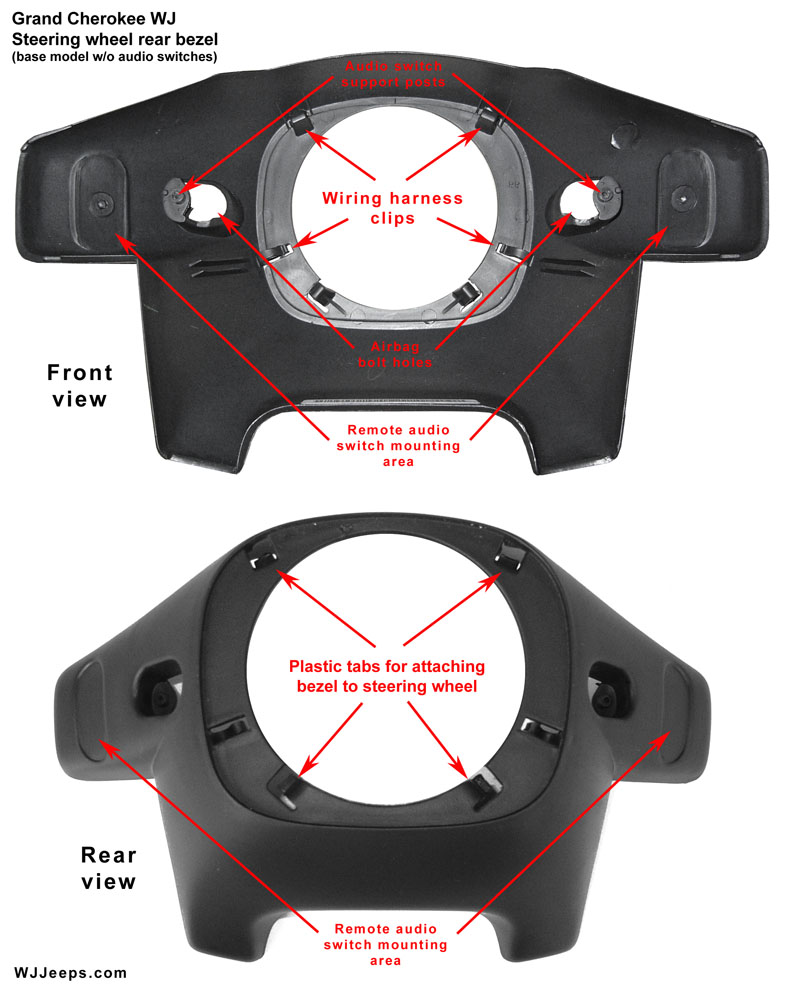
6. Unfasten the plastic bezel on the back of the steering wheel and replace it with the new bezel that has the steering wheel remote radio button holes.
7. Install the two radio remote switches into their slots in the back of the new bezel. These require a firm push to snap them into place. Make sure that they are seated firmly in in the mounting hole and that the plastic “arms” are lined up into their guideposts.
8. Reinstall both cruise control switches on the front of the bezel.
9. Reinstall the steering wheel and bezel, using a brand new nut and tighten it to the proper torque (40 ft. lbs.).
10. Wiring connections:
| 1999-2001 models:A. Replace the existing base harness with the 2001 premium harness (P/N 56042592AB). This harness, for reasons unknown, is expensive but can sometimes be found for a reasonable price at a salvage yard.
OR B. Leave the existing harness attached as it is (to the cruise buttons and clockspring). Obtain a 2002-2004 premium harness (P/N 56042934AA, MSRP $149.99) and adapt it to plug into the 6-pin clockspring connector per this diagram. 2002-2004 models: Replace the existing base harness with the 2002-2004 premium harness (P/N 56042934AA, MSRP $149.99). This harness will plug directly into the clockspring and into the cruise and radio switches without any modifications.
|
11. Reinstall the airbag. Carefully position the driver airbag module in the steering wheel. Be certain that the clockspring pigtail wires and steering wheel wire harness in the steering wheel hub area are not pinched between the driver airbag and the steering wheel armature. From the underside of the steering wheel, install and tighten the two 8mm bolts that secure the driver airbag to the steering wheel armature. Tighten the bolts to 10 Nm (90 in. lbs.).
12. Reconnect the negative battery terminal, turn on the radio and test the switches.
WJ steering wheel switch wiring detail

1999-2001 models
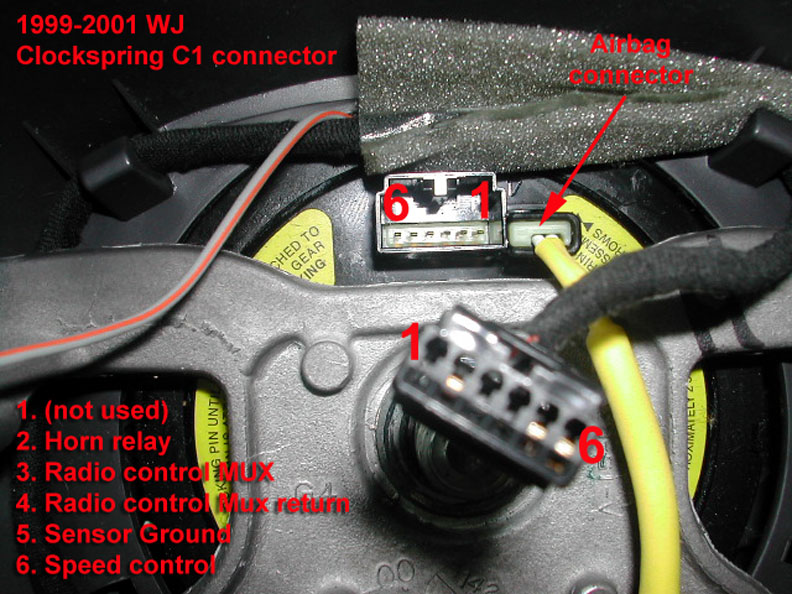
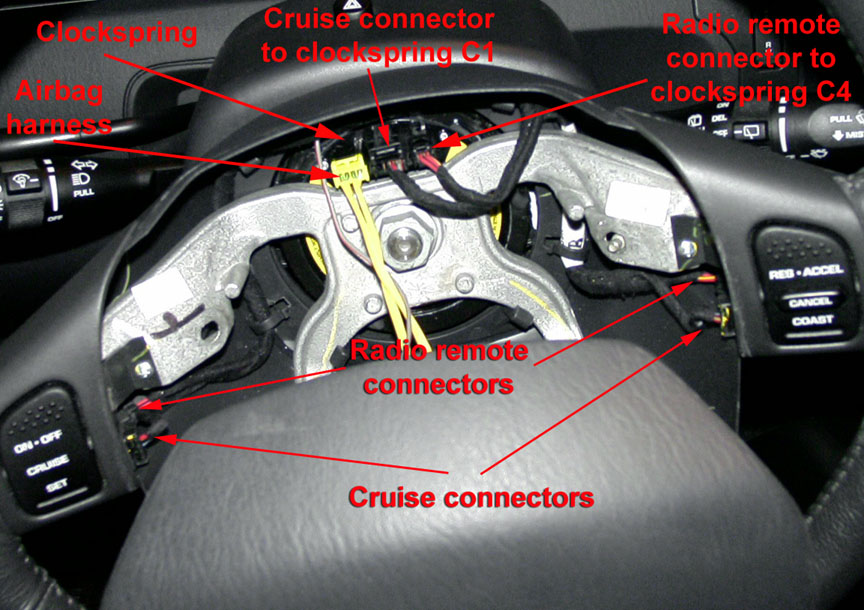
Clockspring and wiring for the airbag, horn, cruise control and remote radio switches
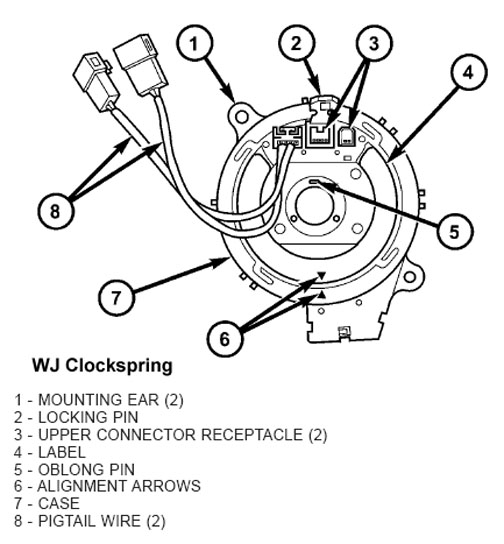
The clockspring is a mechanical electrical circuit component that is used to provide continuous electrical continuity between the fixed instrument panel wire harness and the electrical components mounted on or in the rotating steering wheel. On the Grand Cherokee WJ the rotating electrical components include the driver airbag, the horn switch, the speed control switches, and the remote radio switches, if the vehicle is so equipped. The clockspring case is positioned and secured to the multi-function switch mounting housing near the top of the steering column. The connector receptacles on the tail of the fixed clockspring case connects the clockspring to the vehicle electrical system through two take outs with connectors from the instrument panel wire harness.
2002-2004 models
Clockspring and wiring for the airbag, horn, cruise control and remote radio switches
1999-2004 models
Remote radio switch parts
| Model Year | Description | Part # | MSRP |
| 1999-2004 | Left radio remote switch | 56042313AB | $39.70 |
| 1999-2004 | Right radio remote switch | 56042312AB | $39.60 |
Misc. steering wheel parts
| Item | Part # | MSRP |
| Wiring harness (w/o remote radio switch) | 56042595AB (2001) (discontinued)56042937AA (2002-2004) | $117.00$90.10 |
| Wiring harness (with remote radio switch) | 56042592AB (2001)56042934AA (2002-2004) | $160.00$165.00 |
| Bolt, steering wheel | 6505248AA (1999-2004) | $ 5.10 |
| Clockspring | 56042341AD(1999)56042341AE (2000-2001)
56042770AD (2002-2003) 56042770AE (2004) |
$67.50$126.00
$141.00 $132.00 |
Cruise control switch parts
| Model year | Color | Switch | Part # | MSRP |
| 2000-2001 | Agate (AZ) (Leather wrapped wheel) |
LeftRight | 5GY391AZAA5GY381AZAA (discontinued) | $24.00 |
| 1999-2004 | Black (Vinyl wrapped wheel) |
LeftRight | 56042311AC56042310AC | $25.45 |
| 2001-2004 | Black (TM) (Leather wrapped wheel) |
LeftRight | 5GY391TMAA5GY381TMAA | $26.00 |
| 2000-2004 | Brown, Dark (L8) (Leather wrapped wheel) |
LeftRight | 5GY391L8AA5GY381L8AA | $23.85$25.45 |
| 2000 | Camel, Dark (K9) (Leather wrapped wheel) |
LeftRight | 5GY391K9AA5GY381K9AA (discontinued) | $31.10 |
| 2002-2004 | Quartz, Dark (DV) (Leather or Leather/wood wrapped wheel) |
LeftRight | 5GY391DVAA5GY381DVAA | $24.00 |
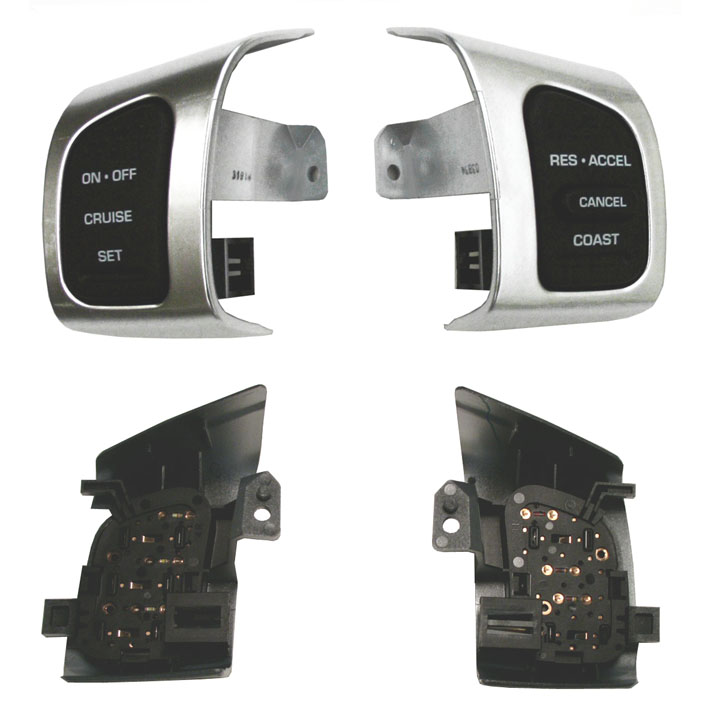
Although the silver cruise buttons used on the Jeep Liberty (shown above) are somewhat similar to those of the WJ, they are shaped different enough that they are not interchangeable.
Airbag module covers

| Trim color | Part # | MSRP |
| Agate (AZ) | SX52LAZAA (1999-2000) (discontinued)UU61LAZAA (2001) | $185.00$222.00 |
| Black (TM) | UU61XTMAA (2001)WH20XTMAA (2002-2004) | $307.00$310.00 |
| Brown, Dark (L8) | SX52WL8AA (1999-2000) (discontinued)UU61WL8AA (2001)
WH20WL8AA (2002-2004) |
$292.00$207.00
$264.00 |
| Camel, Dark (K9) | SX52VK9AA (1999-2000) (discontinued) | $161.00 |
| Gray, Dark Slate (DV) | WH20XDVAA (2002-2004) | $274.00 |
WJ steering wheels
(Steering wheel and rear bezel only, does not include airbag, airbag cover, switches or wiring)

| Trim color | Style | Part # | MSRP |
| Agate (AZ) | Vinyl | 5FK841AZAG superseded by 5HM231AZAA(1999)5HM231AZAA (2000-2001) |
$250.00 |
| Agate (AZ) | Leather | 5FA111AZAG (1999)WB611AZAC (2000)
5HM241AZAA |
$395.00$299.00
$299.00 |
| Black (TM) | Leather | 5HM241TMAA superseded by WB611TMAC (2001)WB611TMAC (2002)5HM241TMAB (2003)WB611TMAC (2004) |
$292.00$292.00
$332.00 $292.00 |
| Brown, Dark (L8) | Leather | 5FA111L8AG (1999) (discontinued)WB611L8AB (2000, 2002)
WB611L8AA (2001) WB611L8AC (2003) WB611L8AC (2004) |
$537.00$290.00
$287.00 $374.00 $374.00 |
| Camel, Dark (K9) | Leather | 5FA111K9AG (1999) (discontinued)WB611K9AC (2000) | $545.00$415.00 |
| Quartz, Dark (DV) | Vinyl | 5HM231DVAB (2002)5HM231DVAD (2003)
YF741DVAC (2004) |
$204.00$242.00
$312.00 |
| Quartz, Dark (DV) | Leather | WB611DVAA (2002)WB611DVAC (2003)
XU851DVAA (2003) WB611DVAC (2004) |
$375.00$427.00
(Cancelled) $427.00 |
| Quartz, Dark (DV) | Leather / Redwood(standard on Overland) | 5GV251DVAD (2002) (discontinued)5GV251DVAD (2003) (discontinued)
YF791DVAB (2002-2004) |
$709.00$790.00
$874.00 |